In Stock Portfolio Organizer trades can be imported via the the ‘Transaction Import Wizard’. The import wizard works on CSV data but can work on other formats using plugins that convert data to the CSV format. Generally a comma-separated values (CSV) file stores tabular data (numbers and text) in plain text. Each line of the file is a data record. Each record consists of one or more fields separated by commas. The use of the comma as a field separator is the source of the name for this file format. The CSV file format is very common and is supported by many online brokers. The following is an example of how a CSV file would look like if opened in a text editor:
Name,Email,Phone Number,Address
Bob Smith,bob@example.com,123-456-7890,123 Fake Street
Mike Jones,mike@example.com,098-765-4321,321 Fake Avenue
If after reading this tutorial you are having difficulty importing your trades or your broker is providing data that is not in a CSV format, we would like to know and may be able to help. So please don’t hesitate to contact support.
Step 1: Open 'Transaction Import Wizard' window
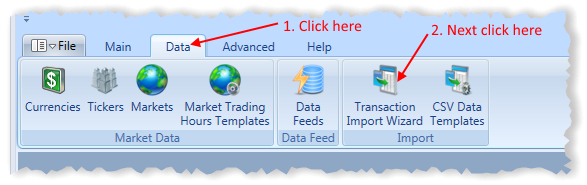
In the main window click the ‘Transaction Import Wizard’ toolbar item under the ‘Data’ tab.
This should open a window that looks similar to the following.
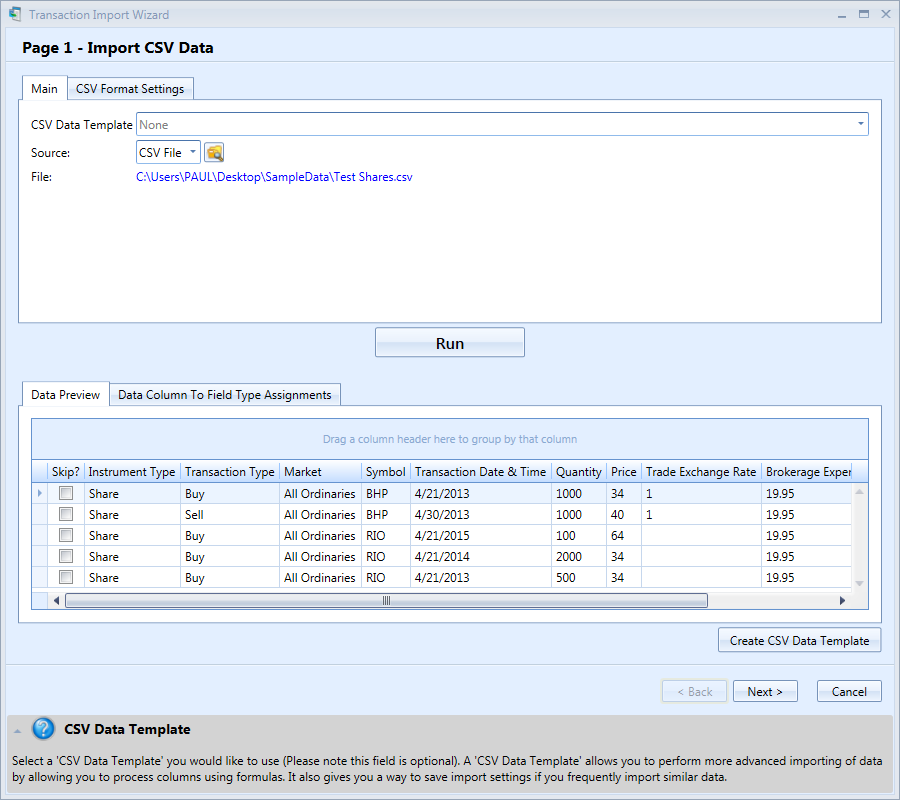
CSV Data Template – Optionally you can select a ‘CSV Data Template’ which specifies how the CSV data is formatted and how it should be processed.
Source – The plugin that will provide the CSV data. For example, ‘CSV File’ plugin reads the data from a file and ‘CSV Script’ plugin runs some JavaScript that returns trades in a CSV data format. We are always looking to expand the list of plugins so if you have any suggestion please let us know.
If the CSV data with your trades doesn’t have a typical layout, you can change the defaults in the ‘CSV Format Settings’ tab. For example, it is common for online brokerage sites to export your trades along with your name and account number on the first couple of lines. In that case you can open the ‘CSV Format Settings’ tab and put say number 2 in the ‘Number Of Lines To Skip’ field.
Step 1A: Expected Data Layout
CSV data may or may not have a header which gives each data column a name. For example, in the CSV file snippet shown at top of this guide, “Name,Email,Phone Number,Address” would be the header record. By default the import wizard needs the header record to be able to determine what each column represents. If the data has no header record, you will need to create a ‘CSV Data Template’ (more on this later). All column names that the import wizard can’t automatically assign to a field type will have to be done manually in the ‘Data Column to Field Type Assignments’ tab. Please refer to the table below for a list of field types and corresponding column names that are recognized. Note that column names are not case sensitive and spacing does not matter. For example, “Transaction Type” will be interpreted exactly the same as “transactiontype” by the program. In fact, as long as the words in the column name are in the correct order it should be recognized.
| Field Type | Column Name | Description |
|---|---|---|
| Transaction Type | Transaction Type | Specifies the transaction type. For example is it a buy or sell transaction? Currently the values 'Buy' or 'B' and 'Sell' or 'S' are supported. |
| Instrument Type | Instrument Type | Specifies the trade type. Expected values are 'Share', 'ShareMargin', 'Forex', 'Futures' |
| Position Type | Position Type | Specifies the position type. Expected values are 'Long' and 'Short' |
| Market | Market | Name of the market. The name should match the market name of a market already in the database. If it doesn't you will be able to specify which market the name represents in a later step. |
| Symbol | Symbol | Ticker symbol name. The symbol name should match the symbol name of a ticker found in the database. If it doesn't you will be able to specify which ticker the symbol name represents in a later step. |
| Transaction Date & Time | Transaction Date Time | Transaction date & time. The built in parser is smart enough to parse most date & time formats be it 'mm/dd/yy', 'mm/dd/yyyy', 'mm-dd-yyyy hh:mm' etc but by default expects the format to be in US format where the month appears before the day. If the transaction date & times in your data are in UK format where the day appears before the month. You can specify this by including a parameter in the column name like so 'Transaction Date Time [UK]' |
| Price | Price | Purchase price or Sell price. |
| Quantity | Quantity | Quantity purchased. |
| Is Fixed Margin | Is Fixed Margin | 'true' or 'false' if the margin is fixed or not |
| Leverage Or Margin Per Contract | Leverage Or Margin Per Contract | The leverage or margin per contract. |
| Tick Size | Tick Size | For futures trades what is the tick size. |
| Tick Value | Tick Value | For futures trades what is the tick value. |
| Lot Size | Lot Size | For forex trades what is the lot size. |
| Trade Currency Conversion Rate | 'Trade Currency Conversion Rate' or 'Trade Exchange Rate' | Trade currency conversion rate. If the trade currency and account currency are different. |
| Brokerage Expenses | Brokerage Expenses | Brokerage expenses. |
| Margin Expenses | Margin Expenses | Margin expenses. |
| Other Expenses | Other Expenses | Other expenses. |
| Note | Note | Any important notes about the trade. |
If all you want to do is import some share trades, the minimum field types your data needs are ‘Transaction Type’, ‘Symbol’, ‘Transaction Date & Time’, ‘Price’, ‘Quantity’ and ‘Brokerage Expenses’.
Once you have imported some CSV data and assigned field types to columns, click ‘Next’ to continue.
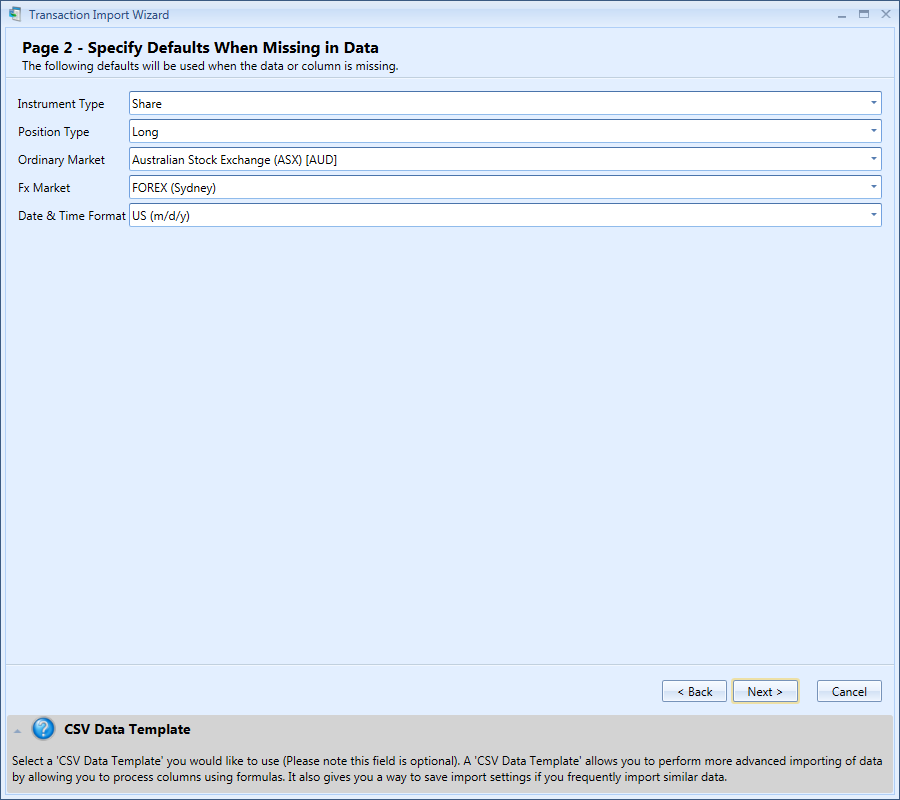
Step 2: Setting Defaults
In this step you need to specify some defaults for those instances where the column is missing or the value itself in the data set is missing. For example, if you are importing share trades for a single market, your data may not have a column that specifies what market your trades are for. In that case the market provided in the ‘Ordinary Market’ field will be used. Once done click ‘Next’.
Step 3: Review Errors
If the preliminary import goes well you should not see this page and the wizard should skip to page 5. Otherwise, you should review all the errors and go back and fix them or click ‘Next’ and fix the errors on the next page.
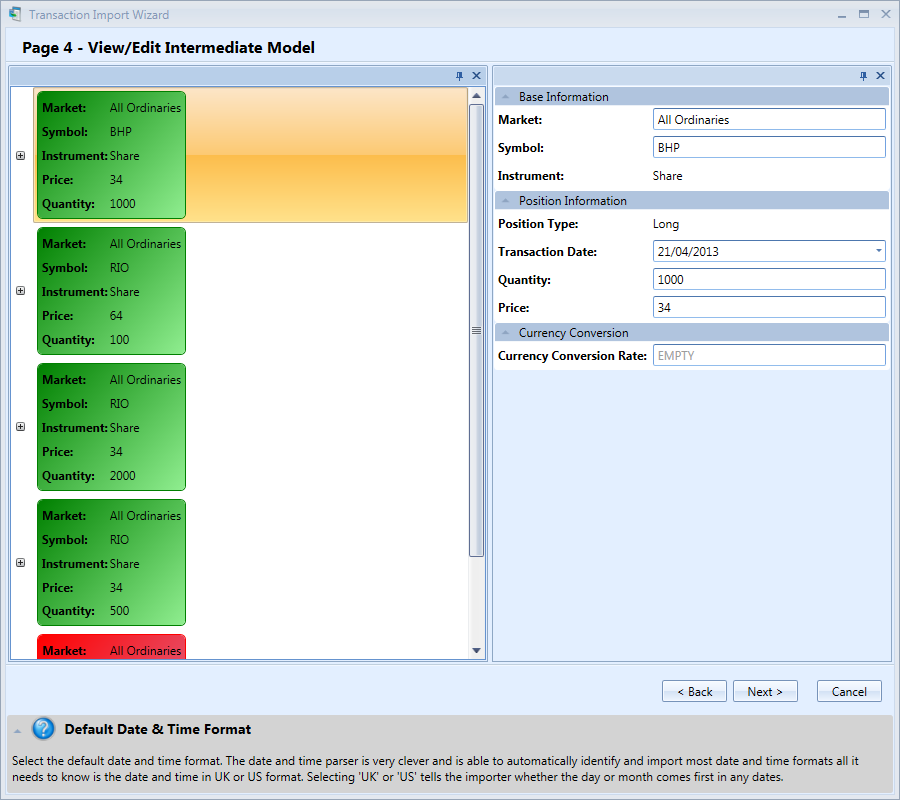
Step 4: Review Intermediate Model
In this step you can view/edit the raw trade data before it is processed further. If you are happy with it, you can click ‘Next’ to continue. If some errors were found in the previous step, you can in most cases fix them here.
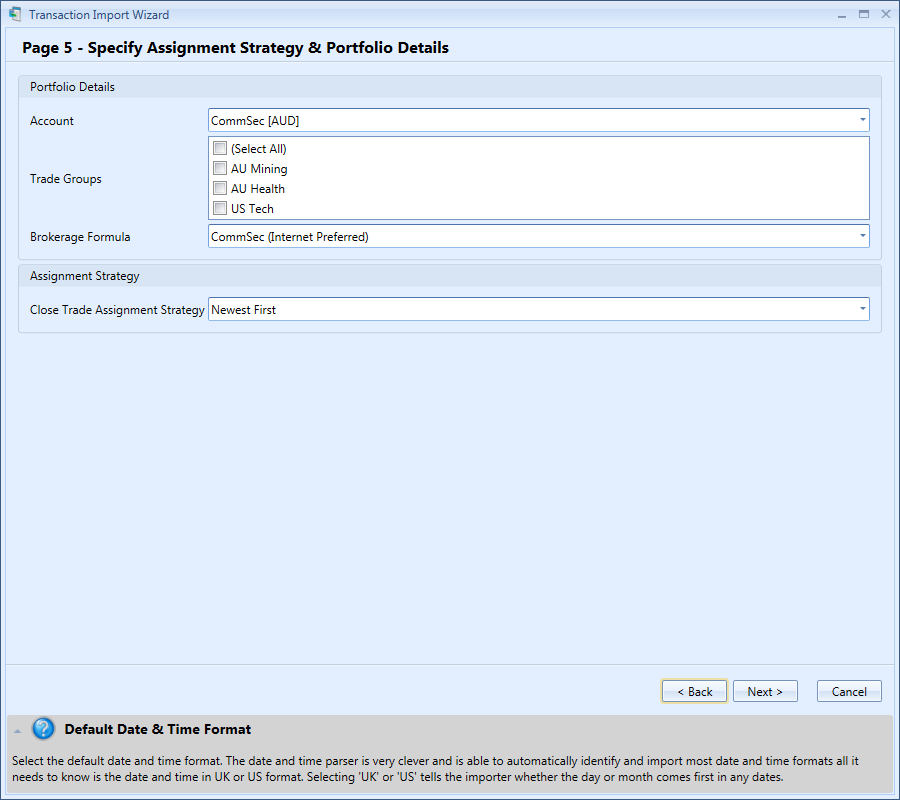
Step 5: Specify Assignment Strategy & Portfolio Details
Hopefully you have made it this far. In this step you will need to specify some portfolio defaults such as which account you want the trades to be imported into and what algorithm you want the program to use to match open and close trades. The ‘Newest First’ assignment strategy means that the most recent open trades will be associated with any matching close trades. For taxation purposes you would most likely want to ‘Minimize Profit’ option to reduce taxable capital gains. What this will do is choose the buy trade transaction that will result in the smallest profit. For example, if you bought 1000 BHP shares for $20 then later bought another 1000 BHP shares for $25 and then sold 1000 BHP shares for $30, Stock Portfolio Organizer will use the shares that were purchased at $25 to calculate the capital gain.
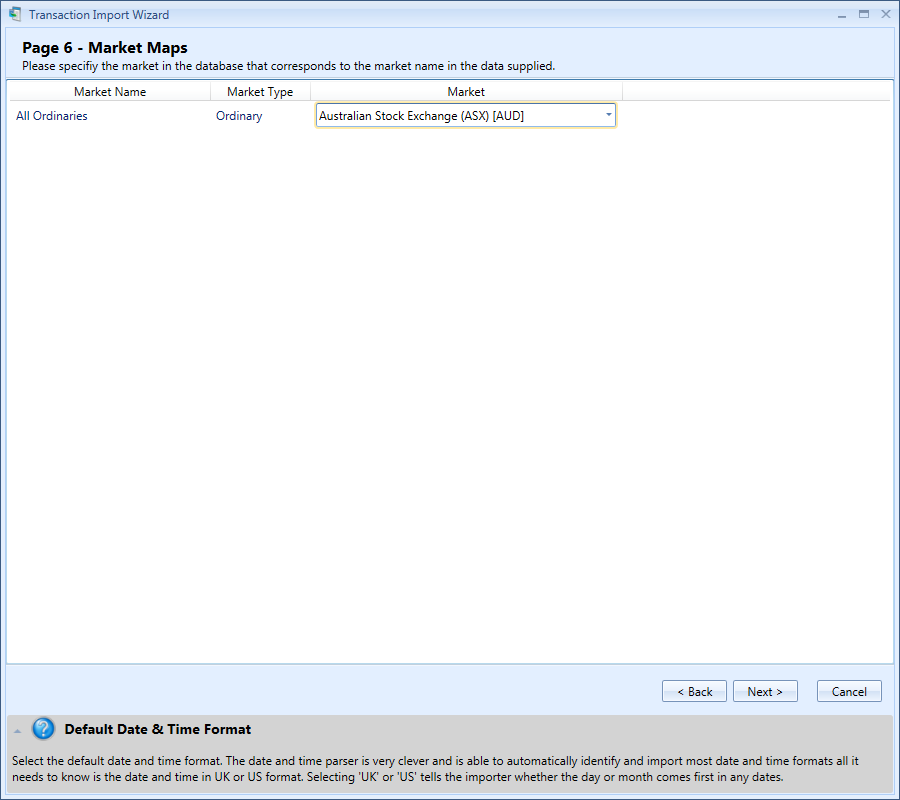
Step 6: Market Maps
If the trades you are importing belong to more than one market, your data needs to contain a column which specifies the market name that each trade belongs to. For example, ‘NASDAQ’ or ‘Australian Stock Exchange (ASX)’ etc. Stock Portfolio Organizer will try to match the market names in your data to market objects in the database. On this page you can modify/correct those matches. If all the trades in your data are for the same market, then you do not need the extra column with the market name. Instead, the default ‘Ordinary Market’ or ‘FX Market’ values (specified in an earlier step) will be used.
Step 7: Ticker Maps
When importing your trades, the importer will automatically try to match the symbol names in your data to the symbol names of tickers in the program’s database. On this page you can modify/correct those matches.

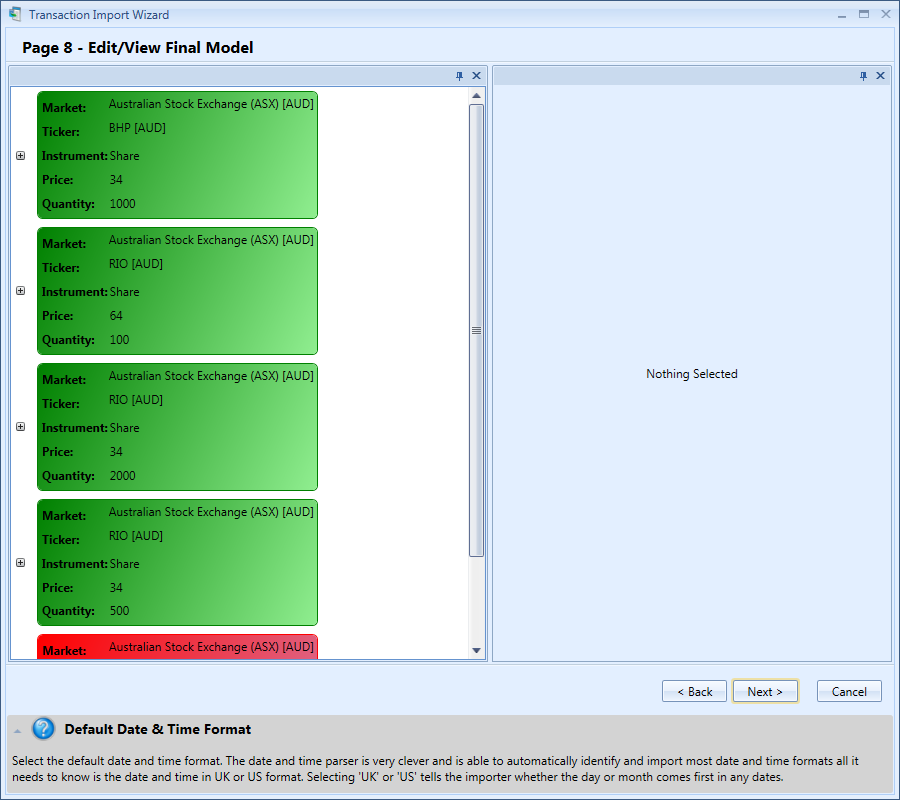
Step 8: Edit/View Final Model
In this step you can view/edit the trades and fix any errors that may have occurred. If market and symbol names have been matched correctly to the ones in your database, there will be no error messages. However, those that couldn’t be matched correctly would have an error message displayed above the item.
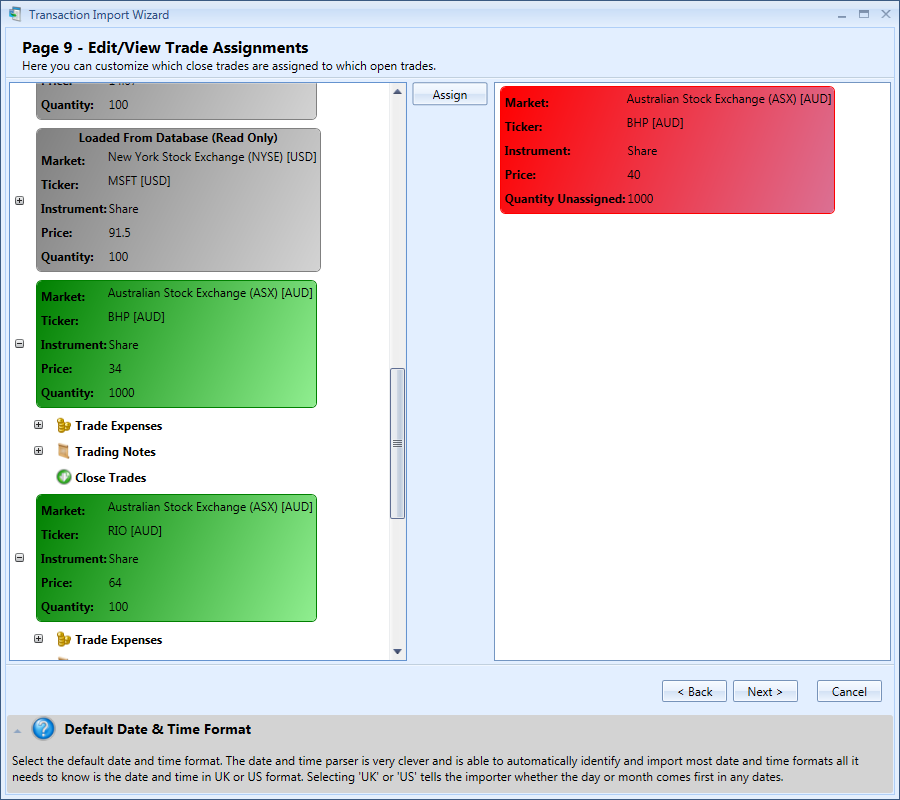
Step 9: Edit/View Trade Assignments
Since it is very difficult to change trade assignments once they are imported, in this step you have a chance to change any assignments. To remove a close trade from an open trade simply expand the open trade tree view to the close trade you wish to remove and click the button with the X. To assign a close trade to an open trade, first select the open trade next select the close trade then click the ‘Assign’ button.
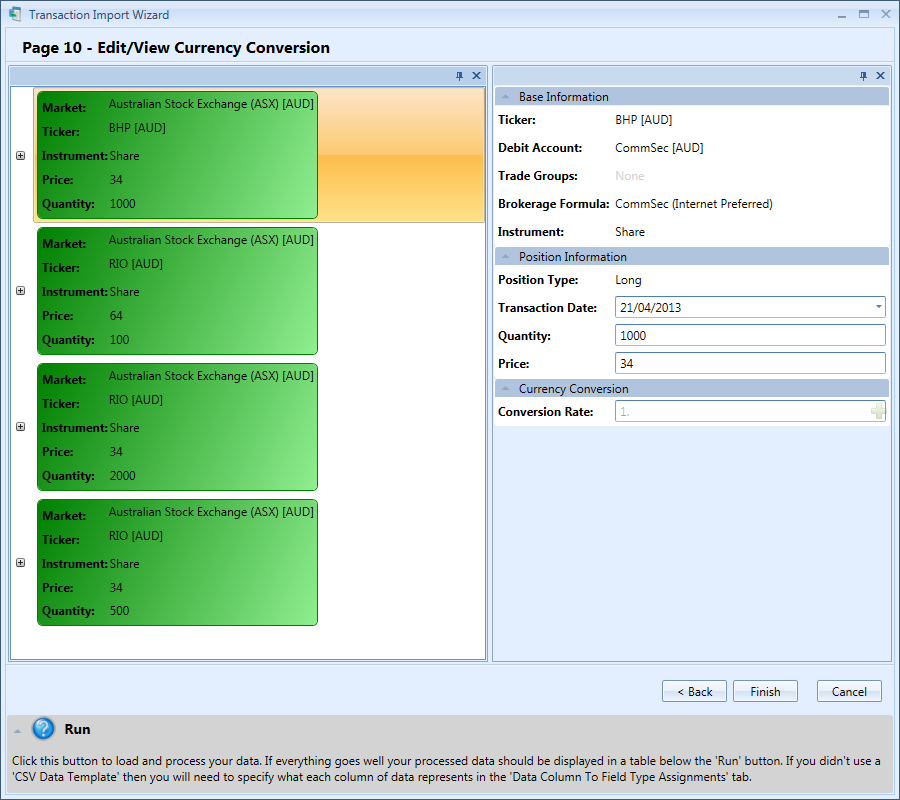
Step 10: Edit/View Currency Conversions
This is the final step where you can view/edit any currency conversion values. This step can be skipped in most case unless you have international trades. Once done simple click ‘Finish’ to import the trades.